Vue2.0+Node.js+MongoDB全栈打造商城系统(7—8章)
第7章 Node.js基础
7-1 Linux环境下配置Node环境
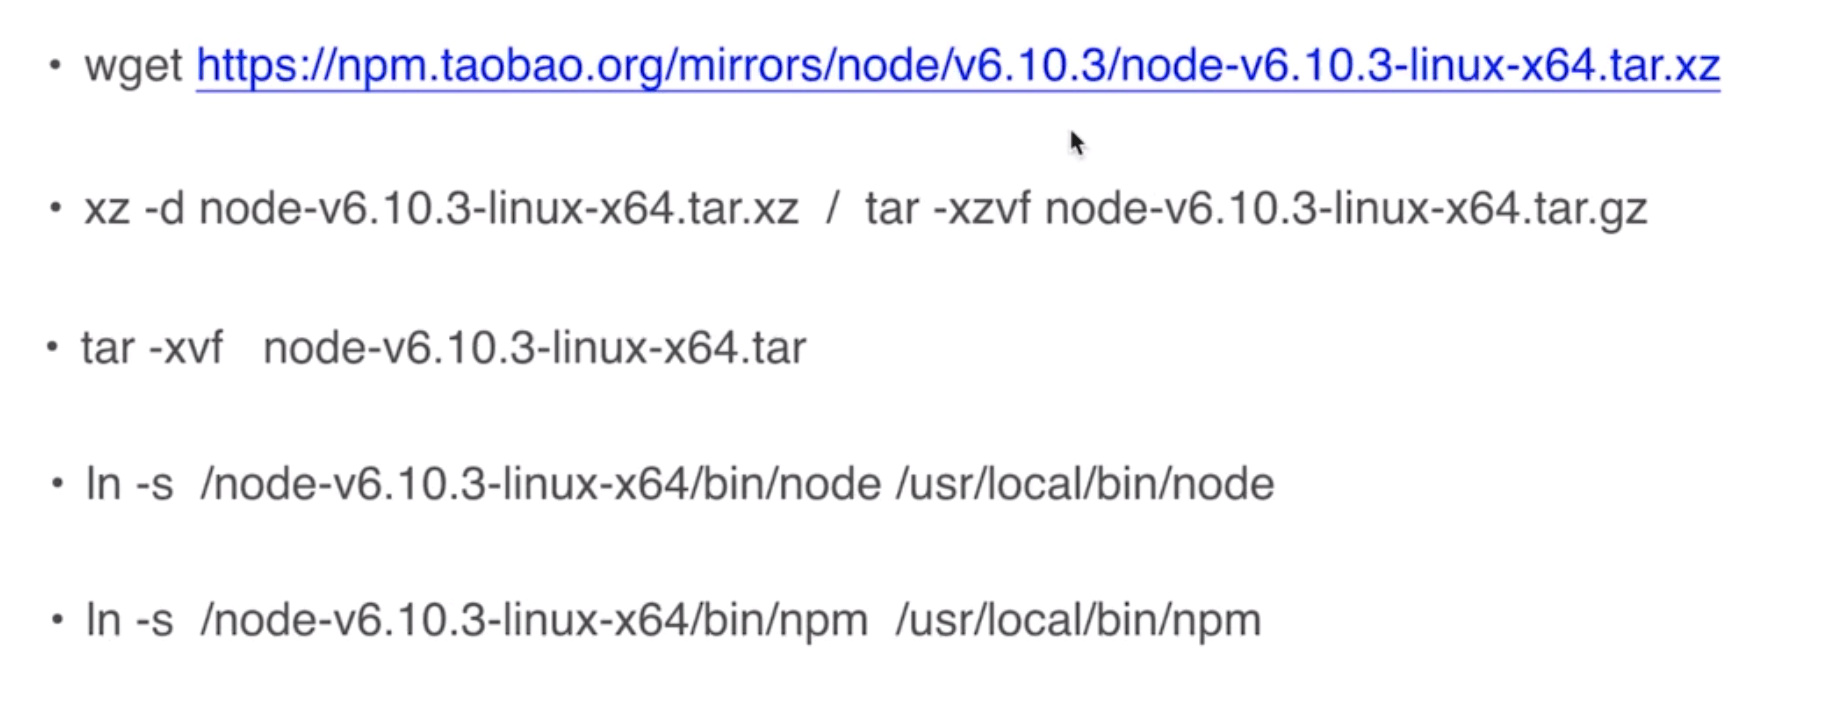
- wget https://npm.taobao.org/mirrors/node/v6.10.3/node-v6.10.3-linux-x64.tar.xz
- xz -d node-v6.10.3-linux-x64.tar.xz
- tar -xvf node-v6.10.3-linux-x64.tar
- ln -s/node-v6.10.3-linux-x64/bin/node/usr/local/bin/node
- ln -s/node-v6.10.3-linux-x64/bin/npm/usr/local/bin/npm
7-2 创建http Server容器

cd 到 server 运行 node Demo.js
demo-server/Demo.js:
let user = require('./User');

console.log(`I'm :${user.userName} ; I say :${user.sayHello()}`);

let http = require('http');
let url = require('url');
let util = require('util');

let server =  http.createServer((req,res)=>{
  res.satatusCode = 200;
  res.setHeader("Content-Type","text/plain; charest=utf-8");

  console.log("url:"+req.url); //一段字符串路径。不全
  console.log(("parse:"+ url.parse(req.url))); //[object]
  console.log("inspect:"+util.inspect(url.parse(req.url)));
  res.end(util.inspect(url.parse(req.url)));
}).listen(3000,'127.0.0.1',()=>{
  console.log("服务器已经运行,请在浏览器打开:http://127.0.0.1:3000/ 来进行访问");

  })
demo-server/User.js:
// module.exports = {
//   userName:"Jack",
//   sayHello:function () {
//     return "hello";
//   }
// }

// 和上面一样
exports.userName = "Jack";
exports.sayHello = function () {
  return "hello";
}
注意:
common规范必须用module.exports输出。util.inspect()调试用,把对象转化为字符串
7-3 通过node加载静态页面
demo-server/Server.js:
let http = require('http');
let url = require('url');
let util = require('util');
let fs = require('fs');
let server =  http.createServer((req,res)=>{
  var pathName = url.parse(req.url).pathname; //拿到当前地址路径
  console.log("url:"+url.parse(req.url).pathname);
  fs.readFile(pathName.substring(1),function (err,data) {
    if (err) {
        res.writeHead(404,{
          'Content-Type':'text/html'
        });
    }else {
      res.writeHead(200,{
        'Content-Type':'text/html'
      });
      res.write(data.toString());
    };
    res.end();
  })
}).listen(3000,'127.0.0.1',()=>{
  console.log("服务器已经运行,请在浏览器打开:http://127.0.0.1:3000/index.html 来进行访问");
})
注意:
url.parse(req.url)得到的是一个object,可以直接.pathname
7-4 搭建基于Express框架的运行环境

安装运行 express :
MingodeMacBook-Pro:server Mingo$ cnpm i express-generator -g
Downloading express-generator to /usr/local/lib/node_modules/express-generator_tmp
Copying /usr/local/lib/node_modules/express-generator_tmp/_express-generator@4.15.5@express-generator to /usr/local/lib/node_modules/express-generator
Installing express-generator's dependencies to /usr/local/lib/node_modules/express-generator/node_modules
[1/4] ejs@2.5.7 installed at node_modules/_ejs@2.5.7@ejs
[2/4] sorted-object@2.0.1 installed at node_modules/_sorted-object@2.0.1@sorted-object
[3/4] commander@2.11.0 installed at node_modules/_commander@2.11.0@commander
[4/4] mkdirp@0.5.1 installed at node_modules/_mkdirp@0.5.1@mkdirp
All packages installed (5 packages installed from npm registry, used 1s, speed 46.83kB/s, json 5(10.01kB), tarball 59.12kB)
[express-generator@4.15.5] link /usr/local/bin/express@ -> /usr/local/lib/node_modules/express-generator/bin/express-cli.js
MingodeMacBook-Pro:server Mingo$ express --version
4.15.5
MingodeMacBook-Pro:server Mingo$ express server

  warning: the default view engine will not be jade in future releases
  warning: use `--view=jade' or `--help' for additional options


   create : server
   create : server/package.json
   create : server/app.js
   create : server/public
   create : server/routes
   create : server/routes/index.js
   create : server/routes/users.js
   create : server/views
   create : server/views/index.jade
   create : server/views/layout.jade
   create : server/views/error.jade
   create : server/bin
   create : server/bin/www
   create : server/public/javascripts
   create : server/public/images
   create : server/public/stylesheets
   create : server/public/stylesheets/style.css

   install dependencies:
     $ cd server && npm install

   run the app:
     $ DEBUG=server:* npm start

MingodeMacBook-Pro:server Mingo$ cd ..
MingodeMacBook-Pro:ImoocMall Mingo$ express server

  warning: the default view engine will not be jade in future releases
  warning: use `--view=jade' or `--help' for additional options


   create : server
   create : server/package.json
   create : server/app.js
   create : server/public
   create : server/routes
   create : server/routes/index.js
   create : server/routes/users.js
   create : server/views
   create : server/views/index.jade
   create : server/views/layout.jade
   create : server/views/error.jade
   create : server/bin
   create : server/bin/www
   create : server/public/javascripts
   create : server/public/images
   create : server/public/stylesheets
   create : server/public/stylesheets/style.css

   install dependencies:
     $ cd server && npm install

   run the app:
     $ DEBUG=server:* npm start

MingodeMacBook-Pro:ImoocMall Mingo$ cnpm i
✔ Installed 45 packages
✔ Linked 42 latest versions
✔ Run 0 scripts
deprecate jade@~1.11.0 Jade has been renamed to pug, please install the latest version of pug instead of jade
deprecate jade@1.11.0 › transformers@2.1.0 Deprecated, use jstransformer
✔ All packages installed (38 packages installed from npm registry, used 3s, speed 45.04kB/s, json 48(105.82kB), tarball 19.22kB)
MingodeMacBook-Pro:ImoocMall Mingo$ cd server
MingodeMacBook-Pro:server Mingo$ node ./bin/www
GET / 200 371.425 ms - 170
GET /stylesheets/style.css 200 23.547 ms - 111
cnpm i express-generator -g:全局安装expressexpress server:创建express服务- 修改
server文件夹里面的package.json合并到外部的package.json。然后重新安装依赖 :cnpm i。 - 修改 server/view文件夹下面的jade文件,替换为html进行渲染
- 删除
server/view文件夹下面的jade文件然后创建html文件 。回到ImoocMall安装ejs:cnpm i ejs --save -
修改
app.js文件var express = require('express'); var path = require('path'); var favicon = require('serve-favicon'); var logger = require('morgan'); var cookieParser = require('cookie-parser'); var bodyParser = require('body-parser'); var ejs = require('ejs'); //引入ejs var index = require('./routes/index'); var users = require('./routes/users'); var app = express(); // view engine setup app.set('views', path.join(__dirname, 'views')); //修改如下两行 app.engine('.html',ejs.__express); app.set('view engine', 'html'); // uncomment after placing your favicon in /public //app.use(favicon(path.join(__dirname, 'public', 'favicon.ico'))); app.use(logger('dev')); app.use(bodyParser.json()); app.use(bodyParser.urlencoded({ extended: false })); app.use(cookieParser()); app.use(express.static(path.join(__dirname, 'public'))); app.use('/', index); app.use('/users', users); // catch 404 and forward to error handler app.use(function(req, res, next) { var err = new Error('Not Found'); err.status = 404; next(err); }); // error handler app.use(function(err, req, res, next) { // set locals, only providing error in development res.locals.message = err.message; res.locals.error = req.app.get('env') === 'development' ? err : {}; // render the error page res.status(err.status || 500); res.render('error'); }); module.exports = app;
- 删除
第8章 MongoDB介绍
8-1 window平台下MongoDB的安装和环境搭建
特点:

安装:
安装配置 MongoDb 参考:
- windows32位系统 安装MongoDB
- MongoDB给数据库创建用户
- 相关软件百度云
- https://www.mongodb.com/download-center?ct=false#community
8-2 Linux平台下安装配置MongoDB
- 详细配置请看项目视频
- 向远程服务器传送文件:
scp /本地目录/ 文件名 root@/远程服务器地址/:/(传到远程服务器根目录) - Mac上传文件到ubuntu1404:
scp -P 26723 /Users/Mingo/Desktop/mongodb-linux-x86_64-ubuntu1404-3.4.4.tar root@104.194.90.192:/
链接服务器上传文件:(在mac电脑的终端操作)
MingodeMacBook-Pro:~ Mingo$ scp  -P 26723 /Users/Mingo/Desktop/mongodb-linux-x86_64-ubuntu1404-3.4.4.tar root@104.194.90.192:/
root@104.194.90.192's password:
mongodb-linux-x86_64-ubuntu1404-3.4.4.tar                         100%  270MB 305.8KB/s   15:05
MingodeMacBook-Pro:~ Mingo$
安装配置 mongodb:(链接服务器后操作)
MingodeMacBook-Pro:~ Mingo$ ssh -l root -p 26723 104.194.90.192
@@@@@@@@@@@@@@@@@@@@@@@@@@@@@@@@@@@@@@@@@@@@@@@@@@@@@@@@@@@
@    WARNING: REMOTE HOST IDENTIFICATION HAS CHANGED!     @
@@@@@@@@@@@@@@@@@@@@@@@@@@@@@@@@@@@@@@@@@@@@@@@@@@@@@@@@@@@
IT IS POSSIBLE THAT SOMEONE IS DOING SOMETHING NASTY!
Someone could be eavesdropping on you right now (man-in-the-middle attack)!
It is also possible that a host key has just been changed.
The fingerprint for the RSA key sent by the remote host is
SHA256:3M3k7ZCJmiyxkSfz+I9NkCq7FeUqqA5L9R5LqnN6hjg.
Please contact your system administrator.
Add correct host key in /Users/Mingo/.ssh/known_hosts to get rid of this message.

#提示 RSA key 错误 就去 known_hosts 中删除错误的key然后再来操作
Offending RSA key in /Users/Mingo/.ssh/known_hosts:2
RSA host key for [104.194.90.192]:26723 has changed and you have requested strict checking.
Host key verification failed.
MingodeMacBook-Pro:~ Mingo$ ssh -l root -p 26723 104.194.90.192
The authenticity of host '[104.194.90.192]:26723 ([104.194.90.192]:26723)' can't be established.
ECDSA key fingerprint is SHA256:At0aH4rWNy6l9ilUl8gQ7egUMkrCe7SKK812dPZ07iM.
Are you sure you want to continue connecting (yes/no)? y
Please type 'yes' or 'no': yes
Warning: Permanently added '[104.194.90.192]:26723' (ECDSA) to the list of known hosts.
root@104.194.90.192's password:
Welcome to Ubuntu 14.04.1 LTS (GNU/Linux 2.6.32-042stab123.3 x86_64)

 * Documentation:  https://help.ubuntu.com/

The programs included with the Ubuntu system are free software;
the exact distribution terms for each program are described in the
individual files in /usr/share/doc/*/copyright.

Ubuntu comes with ABSOLUTELY NO WARRANTY, to the extent permitted by
applicable law.

root@localhost:~# ls -la
total 20
drwx------  3 root root 4096 Oct 18 02:35 .
drwxr-xr-x 23 root root 4096 Oct 17 23:34 ..
-rw-r--r--  1 root root 3106 Feb 19  2014 .bashrc
drwx------  2 root root 4096 Oct 18 02:35 .cache
-rw-r--r--  1 root root  140 Feb 19  2014 .profile
root@localhost:~# cd /
root@localhost:/# ls -la
total 76
drwxr-xr-x 23 root root 4096 Oct 17 23:34 .
drwxr-xr-x 23 root root 4096 Oct 17 23:34 ..
drwx------  2 root root 4096 Oct 17 23:34 .cpt_hardlink_dir_a920e4ddc233afddc9fb53d26c392319
lrwxrwxrwx  1 root root   39 Oct 17 23:34 aquota.group -> /proc/vz/vzaquota/0000f886/aquota.group
lrwxrwxrwx  1 root root   38 Oct 17 23:34 aquota.user -> /proc/vz/vzaquota/0000f886/aquota.user
drwxr-xr-x  2 root root 4096 Jan  8  2015 bin
drwxr-xr-x  2 root root 4096 Jan  8  2015 boot
drwxr-xr-x  6 root root  760 Oct 17 23:34 dev
drwxr-xr-x 86 root root 4096 Oct 17 23:34 etc
-rw-r--r--  1 root root    0 Jan  8  2015 fastboot
drwxr-xr-x  2 root root 4096 Jan  8  2015 home
drwxr-xr-x 13 root root 4096 Oct 17 23:34 lib
drwxr-xr-x  2 root root 4096 Jan  8  2015 lib64
drwx------  2 root root 4096 Jan  8  2015 lost+found
drwxr-xr-x  2 root root 4096 Jan  8  2015 media
drwxr-xr-x  2 root root 4096 Jan  8  2015 mnt
drwxr-xr-x  2 root root 4096 Jan  8  2015 opt
dr-xr-xr-x 19 root root    0 Oct 17 23:34 proc
drwx------  3 root root 4096 Oct 18 02:35 root
drwxr-xr-x 11 root root  380 Oct 18 02:35 run
drwxr-xr-x  2 root root 4096 Oct 17 23:34 sbin
drwxr-xr-x  2 root root 4096 Jan  8  2015 srv
drwxr-xr-x  7 root root    0 Oct 17 23:34 sys
drwxrwxrwt  2 root root 4096 Oct 18 01:44 tmp
drwxr-xr-x 10 root root 4096 Jan  8  2015 usr
drwxr-xr-x 12 root root 4096 Jan  8  2015 var
root@localhost:/# tar -zxvf mongodb-linux-x86_64-ubuntu1404-3.4.4.tar

gzip: stdin: not in gzip format
tar: Child returned status 1
tar: Error is not recoverable: exiting now
root@localhost:/# tar -xvf mongodb-linux-x86_64-ubuntu1404-3.4.4.tar  // 解压
mongodb-linux-x86_64-ubuntu1404-3.4.4/README
mongodb-linux-x86_64-ubuntu1404-3.4.4/THIRD-PARTY-NOTICES
mongodb-linux-x86_64-ubuntu1404-3.4.4/MPL-2
mongodb-linux-x86_64-ubuntu1404-3.4.4/GNU-AGPL-3.0
mongodb-linux-x86_64-ubuntu1404-3.4.4/bin/mongodump
mongodb-linux-x86_64-ubuntu1404-3.4.4/bin/mongorestore
mongodb-linux-x86_64-ubuntu1404-3.4.4/bin/mongoexport
mongodb-linux-x86_64-ubuntu1404-3.4.4/bin/mongoimport
mongodb-linux-x86_64-ubuntu1404-3.4.4/bin/mongostat
mongodb-linux-x86_64-ubuntu1404-3.4.4/bin/mongotop
mongodb-linux-x86_64-ubuntu1404-3.4.4/bin/bsondump
mongodb-linux-x86_64-ubuntu1404-3.4.4/bin/mongofiles
mongodb-linux-x86_64-ubuntu1404-3.4.4/bin/mongooplog
mongodb-linux-x86_64-ubuntu1404-3.4.4/bin/mongoreplay
mongodb-linux-x86_64-ubuntu1404-3.4.4/bin/mongoperf
mongodb-linux-x86_64-ubuntu1404-3.4.4/bin/mongod
mongodb-linux-x86_64-ubuntu1404-3.4.4/bin/mongos
mongodb-linux-x86_64-ubuntu1404-3.4.4/bin/mongo
root@localhost:/# ls -la
total 276924
drwxr-xr-x 24 root root      4096 Oct 18 03:07 .
drwxr-xr-x 24 root root      4096 Oct 18 03:07 ..
drwx------  2 root root      4096 Oct 17 23:34 .cpt_hardlink_dir_a920e4ddc233afddc9fb53d26c392319
lrwxrwxrwx  1 root root        39 Oct 17 23:34 aquota.group -> /proc/vz/vzaquota/0000f886/aquota.group
lrwxrwxrwx  1 root root        38 Oct 17 23:34 aquota.user -> /proc/vz/vzaquota/0000f886/aquota.user
drwxr-xr-x  2 root root      4096 Jan  8  2015 bin
drwxr-xr-x  2 root root      4096 Jan  8  2015 boot
drwxr-xr-x  6 root root       760 Oct 17 23:34 dev
drwxr-xr-x 86 root root      4096 Oct 17 23:34 etc
-rw-r--r--  1 root root         0 Jan  8  2015 fastboot
drwxr-xr-x  2 root root      4096 Jan  8  2015 home
drwxr-xr-x 13 root root      4096 Oct 17 23:34 lib
drwxr-xr-x  2 root root      4096 Jan  8  2015 lib64
drwx------  2 root root      4096 Jan  8  2015 lost+found
drwxr-xr-x  2 root root      4096 Jan  8  2015 media
drwxr-xr-x  2 root root      4096 Jan  8  2015 mnt
drwxr-xr-x  3 root root      4096 Oct 18 03:07 mongodb-linux-x86_64-ubuntu1404-3.4.4
-rw-r--r--  1 root root 283484160 Oct 18 03:03 mongodb-linux-x86_64-ubuntu1404-3.4.4.tar
drwxr-xr-x  2 root root      4096 Jan  8  2015 opt
dr-xr-xr-x 19 root root         0 Oct 17 23:34 proc
drwx------  3 root root      4096 Oct 18 02:47 root
drwxr-xr-x 11 root root       380 Oct 18 02:48 run
drwxr-xr-x  2 root root      4096 Oct 17 23:34 sbin
drwxr-xr-x  2 root root      4096 Jan  8  2015 srv
drwxr-xr-x  7 root root         0 Oct 17 23:34 sys
drwxrwxrwt  2 root root      4096 Oct 18 02:44 tmp
drwxr-xr-x 10 root root      4096 Jan  8  2015 usr
drwxr-xr-x 12 root root      4096 Jan  8  2015 var
root@localhost:/# mkdir mongodb
root@localhost:/# mv mongodb
mongodb/                                   mongodb-linux-x86_64-ubuntu1404-3.4.4.tar
mongodb-linux-x86_64-ubuntu1404-3.4.4/
root@localhost:/# mv mongodb-linux-x86_64-ubuntu1404-3.4.4 mongodb
root@localhost:/# cd mongodb
root@localhost:/mongodb# ls -la
total 12
drwxr-xr-x  3 root root 4096 Oct 18 03:09 .
drwxr-xr-x 24 root root 4096 Oct 18 03:09 ..
drwxr-xr-x  3 root root 4096 Oct 18 03:07 mongodb-linux-x86_64-ubuntu1404-3.4.4
root@localhost:/mongodb# mkdir data
root@localhost:/mongodb# mkdir logs
root@localhost:/mongodb# cd logs
root@localhost:/mongodb/logs# touch mongo.log
root@localhost:/mongodb/logs# cd ..
root@localhost:/mongodb# mkdir etc
root@localhost:/mongodb# cd etc/
root@localhost:/mongodb/etc# vi mongo.conf
root@localhost:/mongodb/etc# cd ..
root@localhost:/mongodb# cd mongodb-linux-x86_64-ubuntu1404-3.4.4/bin
root@localhost:/mongodb/mongodb-linux-x86_64-ubuntu1404-3.4.4/bin# mongod -f /mongodb/etc/mongo.conf-bash: mongod: command not found
root@localhost:/mongodb/mongodb-linux-x86_64-ubuntu1404-3.4.4/bin# cd /
root@localhost:/# mongo
-bash: mongo: command not found
// 创建 mongo 的软连接
root@localhost:/# ln -s /mongodb/mongodb-linux-x86_64-ubuntu1404-3.4.4/bin/mongo /usr/local/bin/mongo
root@localhost:/# mongo
MongoDB shell version v3.4.4
connecting to: mongodb://127.0.0.1:27017
2017-10-18T03:18:24.792-0400 W NETWORK  [thread1] Failed to connect to 127.0.0.1:27017, in(checking socket for error after poll), reason: Connection refused
2017-10-18T03:18:24.792-0400 E QUERY    [thread1] Error: couldn't connect to server 127.0.0.1:27017, connection attempt failed :
connect@src/mongo/shell/mongo.js:237:13
@(connect):1:6
exception: connect failed
root@localhost:/# mongod -f /mongodb/etc/mongo.conf
-bash: mongod: command not found
root@localhost:/# mongo -f /mongodb/etc/mongo.conf
Error parsing command line: unrecognised option '-f'
try 'mongo --help' for more information
// 创建 mongod 的软连接
root@localhost:/# ln -s /mongodb/mongodb-linux-x86_64-ubuntu1404-3.4.4/bin/mongod /usr/local/bin/mongod
root@localhost:/# mongod -f /mongodb/etc/mongo.conf
开启服务器端MongoDB的服务:
Last login: Wed Oct 18 14:47:45 on ttys003
MingodeMacBook-Pro:~ Mingo$ ssh -l root -p 26723 104.194.90.192
root@104.194.90.192's password:
Welcome to Ubuntu 14.04.1 LTS (GNU/Linux 2.6.32-042stab123.3 x86_64)

 * Documentation:  https://help.ubuntu.com/
Last login: Wed Oct 18 02:43:36 2017 from 27.19.0.6
root@localhost:~# mongod -f /mongodb/etc/mongo.conf //启动配置文件
root@localhost:~# cd /
root@localhost:/# mongo //开启服务
MongoDB shell version v3.4.4
connecting to: mongodb://127.0.0.1:27017
MongoDB server version: 3.4.4
Welcome to the MongoDB shell.
For interactive help, type "help".
For more comprehensive documentation, see
	http://docs.mongodb.org/
Questions? Try the support group
	http://groups.google.com/group/mongodb-user
Server has startup warnings:
2017-10-18T03:21:07.767-0400 I STORAGE  [initandlisten]
2017-10-18T03:21:07.767-0400 I STORAGE  [initandlisten] ** WARNING: Using the XFS filesystem is strongly recommended with the WiredTiger storage engine
2017-10-18T03:21:07.767-0400 I STORAGE  [initandlisten] **          See http://dochub.mongodb.org/core/prodnotes-filesystem
2017-10-18T03:21:07.891-0400 I CONTROL  [initandlisten]
2017-10-18T03:21:07.892-0400 I CONTROL  [initandlisten] ** WARNING: Access control is not enabled for the database.
2017-10-18T03:21:07.892-0400 I CONTROL  [initandlisten] **          Read and write access to data and configuration is unrestricted.
2017-10-18T03:21:07.892-0400 I CONTROL  [initandlisten] ** WARNING: You are running this process as the root user, which is not recommended.
2017-10-18T03:21:07.892-0400 I CONTROL  [initandlisten]
2017-10-18T03:21:07.892-0400 I CONTROL  [initandlisten]
2017-10-18T03:21:07.892-0400 I CONTROL  [initandlisten] ** WARNING: You are running in OpenVZ which can cause issues on versions of RHEL older than RHEL6.
2017-10-18T03:21:07.892-0400 I CONTROL  [initandlisten]
> show dbs //查看
admin  0.000GB
local  0.000GB
> use demo //创建
switched to db demo
> db.goods.insert({id:1000,"name":"test it"}) //插入
WriteResult({ "nInserted" : 1 })
> db.goods.find()  //查找
{ "_id" : ObjectId("59e703366af52bb997b230ca"), "id" : 1000, "name" : "test it", "salePrice" : 10000 }
>
优秀问答:
- 问: 老师,我想问一下我从你的云盘上下载的mongohub,在使用时并没有collection的操作选项,是怎么回事?
- 答: 好像是和OSX的版本有冲突,在网上找了一个新的版本就可以啦。说明网址: https://stackoverflow.com/questions/12708856/mongohub-mongo-database-gui-for-mac-no-longer-works
下载网址: https://mongohub.s3.amazonaws.com/MongoHub.zip
- 答: 好像是和OSX的版本有冲突,在网上找了一个新的版本就可以啦。说明网址: https://stackoverflow.com/questions/12708856/mongohub-mongo-database-gui-for-mac-no-longer-works
- 问: 执行mongod时 报-bash:mongod:command not found
- 答: 环境变量没有配置,视频有讲解如何配置,讲的是通过建立软连接的形式
- 我也遇到了这个问题,这个错误是由于安装的mongodb的版本问题,我的服务器系统是centos,但是根据课程安装的是ubuntu,导致无法启动;你也检查一下你的服务器的系统版本,如果也是centos,可以直接下载linix版本,然后再按照老师的安装步骤,就可以了
8-3 给MongoDB创建用户
说明:细节看项目视频

Mac 端安装配置 MongoDB
brew install mongodb(如果安装了 brew 就执行)-
在 Mac 的 / 根目录 创建 mongodb 文件夹。文件夹内结构:
  Last login: Wed Oct 18 17:22:48 on ttys003
  MingodeMacBook-Pro:~ Mingo$ cd /mongodb
  MingodeMacBook-Pro:mongodb Mingo$ tree
  -bash: tree: command not found
  MingodeMacBook-Pro:mongodb Mingo$ @tree
  -bash: @tree: command not found
  MingodeMacBook-Pro:mongodb Mingo$ alias tree="find . -print | sed -e 's;[^/]*/;|____;g;s;____|; |;g'"
  MingodeMacBook-Pro:mongodb Mingo$ tree
  .
  |____.DS_Store
  |____bin
  | |____bsondump
  | |____mongo
  | |____mongod
  | |____mongodump
  | |____mongoexport
  | |____mongofiles
  | |____mongoimport
  | |____mongooplog
  | |____mongoperf
  | |____mongorestore
  | |____mongos
  | |____mongosniff
  | |____mongostat
  | |____mongotop
  |____data
  | |____.DS_Store
  | |_____mdb_catalog.wt
  | |____collection-0-7686511552270792180.wt
  | |____diagnostic.data
  | | |____metrics.2017-10-18T09-43-18Z-00000
  | |____index-1-7686511552270792180.wt
  | |____journal
  | | |____WiredTigerLog.0000000001
  | | |____WiredTigerPreplog.0000000001
  | | |____WiredTigerPreplog.0000000002
  | |____mongod.lock
  | |____sizeStorer.wt
  | |____storage.bson
  | |____WiredTiger
  | |____WiredTiger.lock
  | |____WiredTiger.turtle
  | |____WiredTiger.wt
  | |____WiredTigerLAS.wt
  |____etc
  | |____mongo.conf
  |____GNU-AGPL-3.0
  |____logs
  | |____mongo.log
  |____MPL-2
  |____README
  |____THIRD-PARTY-NOTICES
  MingodeMacBook-Pro:mongodb Mingo$
其中
mongo.conf:dbpath=/mongodb/data logpath=/mongodb/logs/mongo.log logappend=true journal=true quiet=true port=27017
启动服务:
mongod -f /mongodb/etc/mongo.conf
注意:
mongo.conf中path的路径不能错。同时执行 mongo.conf的路径也不能错。
附加知识:
执行如下
alias tree="find . -print | sed -e 's;[^/]*/;|____;g;s;____|; |;g'"
然后执行 tree 可以查到当前文件夹目录树
连接服务器的 MongoDB数据库
- 连接服务器:
ssh -l root -p 26723 104.194.90.192 - 启动 mongo 服务:
mongo - 启动 mongo 配置:
mongod -f /mongodb/etc/mongo.conf(软连接要建立而且路径要对)
设置登录数据库验证
- 开启非验证服务:
mongod -f /mongodb/etc/mongo.conf - 新开窗口开启 mongo 服务:
mongo - 创建 dumall 数据库:
use dumall。(没插入数据前show dbs 是看不到的) -
创建验证用户名和角色:
db.createUser({user:'root',pwd:'666666',roles:[{role:'dbOwner',db:'dumall'}]}) - 切换到 dumall:
use dumall - 验证刚才设置的角色:
db.auth("root","666666")(成功返回1) - 插入数据:
db.goods.insert({id:123,name:"hello"}) - 开启验证服务:
mongod -f /mongodb/etc/mongo.conf --auth - 在mongohub链接刚才创建的dumall数据库:
(name为本地自定义昵称,database为数据库名称)

8-4 MongoDB基本语法
说明:细节看项目视频

- 查看数据库:show dbs
- 切换到某个数据库:switches to db demo
- 创建集合的2种方式
db createCollection("user")db.users.insert({id:123,name:'hello'})
- 删除数据库:db.dropDatabase()
- 删除集合 :db.user.drop() :db. 表名.drop()
- 删除: db.user.remove({userid:101})
- 查看表(集合): show collections
- 查询表 :
db.user.find()db.user.find().pretty()- win下可能不支持
db.user.findOne()查第一条
- 条件查询: db.user.find({userAge:{$gt40}})
-
修改:
db.user.update({userName:'jack'},{$set:{userAge:30}}) **注意:**修改条件和修改结果都必须是`json`格式 截图为修改子文档的写法 ## 8-5 表数据设计和插入 **说明:**细节看项目视频